In our previous post, we have seen the features / enhancements to selenium 4, among them Relative locators is one.
Relative locator helps to locate element[s] that are nearby other elements.
RelativeLocator class exposes a method withTagName(String elementTagName) and locators as
- above – Returns the WebElement, which appears above to the specified element
- below – Returns the WebElement, which appears below to the specified element
- toLeftOf – Returns the WebElement, which appears to left of specified element
- toRightOf – Returns the WebElement, which appears to right of the specified element
- near – Returns the WebElement, which is at most
50pxaway from the specified element.
Selenium uses javascript method getBoundingClientRect() to find the relative elements.
To use above locators / methods, we have to import
import static org.openqa.selenium.support.locators.RelativeLocator.withTagName;
Each of the above methods are overloaded methods, and accepts either WebElement or By locator
One can use one or multiple methods from above depending on the need.
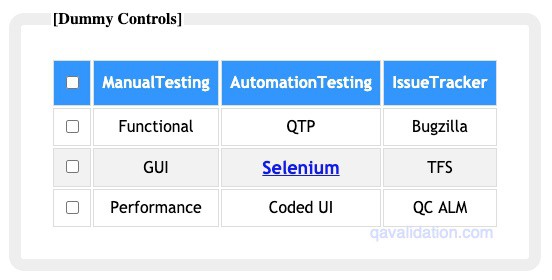
We will be using the grid demo to understand above methods

Use of individual relative locator methods
let’s say, we want to identify the QTP from the above grid using the relative locators.
We can say QTP is either right to Functional or left to Bugzilla
If you run the javascript method getBoundingClientRect()
you will see the y axis is same for QTP, Functional & Bugzilla, only x axis changes.
Based on the x axis values, we can determine whether to use toRightOf() or toLeftOf()
So we need to identify the Functional element and then use the toRightOf()
WebElement Functional = driver.findElement(By.xpath("//td[contains(., 'Functional')]"));
WebElement QTP = driver.findElement(withTagName("td").toRightOf(Functional));
The same way, you can use Bugzilla element and toLeftOf() to identify the QTP field.
Use combination of relative locator methods
Let’s identify the TFS element by saying, below to Bugzilla and above to QC ALM
WebElement bugZ = driver.findElement(By.xpath("//td[contains(., 'Bugzilla')]"));
WebElement qcAlm = driver.findElement(By.xpath("//td[contains(., 'QC ALM')]"));
WebElement TFS = driver.findElement(withTagName("td").below(bugZ).above(qcAlm));
When you run above code, the it will identify the 3rd checkbox instead of TFS
Reason –
When we use below(bugZ) – this returns all the elements below to it, this means 2nd and 3rd row elements
When we use above(qcAlm) – this returns header row, 1st & 2nd row
As we have used combination of below(bugZ) & above(qcAlm) – this returns all the elements of 2nd row, and because we have used driver.findelement(…), this returns 1st occurrence of 2nd row i.e – checkbox
Then how do we identify TFS?
well! the best way to find TFS is below to Bugzilla and right to Selenium link
WebElement bugZ = driver.findElement(By.xpath("//td[contains(., 'Bugzilla')]"));
WebElement selLink = driver.findElement(By.linkText("Selenium"));
WebElement TFS = driver.findElement(withTagName("td").below(bugZ).toRightOf(selLink));
By using above code, we are narrowing down to one element i.e TFS
near() overloaded with another parameter int atMostDistanceWithPixels
be default near() takes the 50px distance elements into consideration, but we can override the distance with the 2nd parameter.


